December 26, 2007

No Fork Required

With all the baked goods and sweets passed around this time of year, I am on sugar overload. I've fed my face with candy, cookies, cake, whatever came my way the entire month of December. So when I came across the chili cook-off, hosted by Tami at Running with Tweezers, I welcomed the change in diet. A hearty bowl of chili fills you up and, depending on the recipe, is chock full of protein. My favorite way to make it is with a lot of meat, a lot of beans, and a lot of veggies. On more than one occasion, I have made a recipe called Boilermaker Tailgate Chili that I found on allrecipes.com. I've made many tweaks to adjust for my family's personal taste, but still use the recipe as the foundation so I have to give proper credit. With it's meaty texture and just the right amount of spice, it has become a family favorite and always pleases even the pickiest of eaters.


Adaptation of Boilermaker Tailgate Chili

2 pounds lean ground beef
1 pound bulk Italian sausage
1 (15 ounce) can pinto beans, drained
1 (15 ounce) can black beans, drained
2 (15 ounce) cans chili beans in spicy sauce
2 (28 ounce) cans diced tomatoes with juice
1 (6 ounce) can tomato paste
1 large yellow onion, chopped
3 stalks celery, chopped
1 green bell pepper, seeded and chopped
1 red bell pepper, seeded and chopped
1/4 of an Anaheim pepper, seeded and chopped
4 teaspoons beef base
1 cup beer
1/8 cup chili powder
1 tablespoon Worcestershire sauce
5 cloves garlic, minced
1 tablespoon dried oregano
1 teaspoon ground cumin
1 teaspoon dried basil
1/2 teaspoon salt
1 teaspoon ground black pepper
1/2 teaspoon cayenne pepper
1/2 teaspoon paprika
2 teaspoons white sugar
1 teaspoon unsweetened cocoa powder
1 (8 ounce) package shredded Cheddar cheese
  1. Heat a large stock pot over medium-high heat. Crumble the ground chuck and sausage into the hot pan, and cook until evenly browned. Drain off excess grease.
  2. Pour in all the cans of beans, diced tomatoes and tomato paste. Add the onion, celery, green and red bell peppers, Anaheim pepper, beef base, and beer. Season with chili powder, Worcestershire sauce, garlic, oregano, cumin, basil, salt, pepper, cayenne, paprika, and sugar. Stir to blend, then cover and simmer over low heat for at least 2 hours, stirring occasionally.
  3. After 2 hours, taste, and adjust salt, pepper, and chili powder if necessary. The longer the chili simmers, the better it will taste. Remove from heat and serve, or refrigerate, and serve the next day.
  4. To serve, ladle into bowls, and top with shredded Cheddar cheese.

December 25, 2007

Sugar and Spice is Very Nice

Cinnamon is one of those versatile spices that is used for both sweet and savory dishes. From chocolate desserts to lamb dishes, and everything in between, cinnamon is quite an adaptive little number. My favorite way to eat it is a fairly traditional and simple approach—combined with sugar.

When Sunita from Sunita's World announced cinnamon as the featured spice for her monthly challenge, I immediately knew what kind of dish I would submit. Something that was sweet enough to play off the spicy cinnamon flavor. How about coffee cake?

Coffee Cake with Crumble Topping and Brown Sugar Glaze
Slightly adapted from this original Emeril Lagasse recipe.

Cake:
1 stick plus 2 teaspoons unsalted butter
1 1/2 cups packed light brown sugar
2 large eggs
2 cups all purpose flour
1 teaspoon baking soda
1 teaspoon ground cinnamon
1/2 teaspoon salt
1 cup sour cream
1 teaspoon pure vanilla extract

Crumble Topping:
1/2 cup packed light brown sugar
1/2 cup all purpose flour
1/2 teaspoon ground cinnamon
4 tablespoons unsalted butter, softened

Brown Sugar Glaze:
1/2 cup packed light brown sugar
1/2 teaspoon vanilla extract
2 tablespoons water

Preheat the oven to 350 degrees F. Lightly grease a 13 by 9-inch glass baking dish with 2 teaspoons of the butter.

In a large bowl, cream together the remaining stick of butter and sugar until light and fluffy. Add the eggs 1 at a time, beating after the addition of each. In a separate bowl or on a piece of parchment, sift together the flour, baking soda, cinnamon, and salt. Add to the wet ingredients, alternating with the sour cream and vanilla. Pour into the prepared baking dish, spreading out to the edges.

To make the topping, in a bowl, combine the sugar, flour, cinnamon, and butter, and mix until it resembles coarse crumbs. Sprinkle the topping over the cake and bake until golden brown and set, 35 to 40 minutes. Remove from the oven and let cool on a wire rack for at least 10 minutes.

To make the glaze, in a bowl, combine the sugar, vanilla, and water and mix until smooth. Drizzle the cake with the glaze and let harden slightly. Serve warm.

While quite tasty and barely a crumb remaining, I do have a few suggestions and rants.The original recipe called for two apples, peeled and cubed. I didn't have any onhand, so I omitted them. While my version tasted fine, I think the apples would have added a nice texture. Also, I felt the brown sugar glaze was a little overkill (even for me). Instead, I would add chopped pecans on top of the crumble topping before baking and leave it at that.

December 22, 2007

Yule Want A Bite of This

If forced to self-evaluate, I would venture to say that I am a stronger cook than baker. But, I enjoy pushing my comfort level in the kitchen and recently joined up with some fellow food-lovin' bloggers in an online baking group affectionately called Daring Bakers.

And "daring" is a perfect way to describe this group. While pastry-chef skills aren't required to participate, gumption is. This is a good thing because I am just a regular gal who happens to enjoying making food just as much as I enjoy eating it. Each month, one member is charged with presenting a new baking challenge to the group. That person communicates what items are required of the task and where participants can customize to show their personal style. On a specified day each month, members blog about that month's challenge, sharing experiences and trading tips.

I encourage you to check out some of the talented bakers in this group. Visit the Daring Bakers' blogroll for the official member list and links to each person's blog.

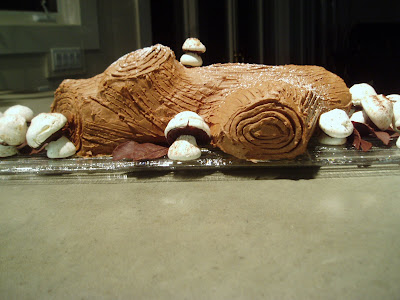
This month's challenge, chosen by the group's founders Ivonne and Lis, was to make a yule log or Bûche de Noël. Growing up, my only exposure to a yule log was on the TV on Christmas eve. A looping tape of a burning log playing against a background of Christmas music. I promptly Googled the term to see what I was really in for.


It took me 8 hours from start to finish, but I completed my first challenge with only minor moments of drama:

  1. One of the requirements was that you had to decorate your log with candy mushrooms made from meringue or marzipan. I chose meringue and ended up having to redo them, as they collapsed shortly after coming out of the oven. I think I didn't whip the whites long enough before piping them. The second batch were much better.
  2. I also go into a fight with my yule log while trying to piece together the "branches." It cracked in some places and crumbled a bit in others. Frosting is a baker's best friend, though, I soon found. After carefully covering all the seams, you would never know that the log had some flaws.

Here are the variations I made:

  • Added Grand Marnier to the buttercream.
  • Sprinkled a thin layer of hazelnuts before rolling up the genoise.
  • Added cocoa powder to my buttercream before frosting to make it look more like wood.
  • Dipped the underside of my mushroom caps in melted chocolate to give the look of mushroom gills.
  • Garnished with chocolate leaves made from painting melted chocolate onto washed lemon leaves, and then peeling off when cooled.

Plain Genoise
3 large eggs
3 large egg yolks
pinch of salt
¾ cup of sugar
½ cup cake flour - spoon flour into dry-measure cup and level off
¼ cup cornstarch
one 10 x 15 inch jelly-roll pan that has been buttered and lined with parchment paper and then buttered again

  1. Set a rack in the middle of the oven and preheat to 400 degrees F.

  2. Half-fill a medium saucepan with water and bring it to a boil over high heat. Lower the heat so the water is simmering.
  3. Whisk the eggs, egg yolks, salt and sugar together in the bowl of a heavy-duty mixer. Place over the pan of simmering water and whisk gently until the mixture is just lukewarm, about 100 degrees if you have a thermometer (or test with your finger - it should be warm to the touch).
  4. Attach the bowl to the mixer and, with the whisk attachment, whip on medium-high speed until the egg mixture is cooled (touch the outside of the bowl to tell) and tripled in volume. The egg foam will be thick and will form a slowly dissolving ribbon falling back onto the bowl of whipped eggs when the whisk is lifted.
  5. While the eggs are whipping, stir together the flour and cornstarch.
  6. Sift one-third of the flour mixture over the beaten eggs. Use a rubber spatula to fold in the flour mixture, making sure to scrape all the way to the bottom of the bowl on every pass through the batter to prevent the flour mixture from accumulating there and making lumps. Repeat with another third of the flour mixture and finally with the remainder.
  7. Scrape the batter into the prepared pan and smooth the top.
  8. Bake the genoise for about 10 to 12 minutes. Make sure the cake doesn’t overbake and become too dry or it will not roll properly.
  9. While the cake is baking, begin making the buttercream.
  10. Once the cake is done (a tester will come out clean and if you press the cake lightly it will spring back), remove it from the oven and let it cool on a rack.

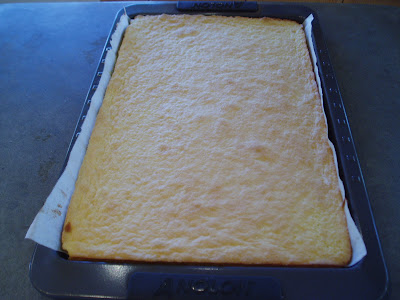
My genoise cooling its jets before getting dressed.


Coffee Buttercream
4 large egg whites
1 cup sugar
24 tablespoons (3 sticks or 1-1/2 cups) unsalted butter, softened
2 tablespoons instant espresso powder
2 tablespoons rum or brandy
  1. Whisk the egg whites and sugar together in the bowl of an electric mixer. Set the bowl over simmering water and whisk gently until the sugar is dissolved and the egg whites are hot.
  2. Attach the bowl to the mixer and whip with the whisk on medium speed until cooled. Switch to the paddle and beat in the softened butter and continue beating until the buttercream is smooth. Dissolve the instant coffee in the liquor and beat into the buttercream.


Meringue Mushrooms
3 large egg whites, at room temperature
¼ teaspoon cream of tartar
½ cup (3-1/2 ounces/105 g.) granulated sugar
1/3 cup (1-1/3 ounces/40 g.) icing sugar
Unsweetened cocoa powder for dusting

  1. Preheat the oven to 225 degrees F. Line 2 baking sheets with parchment. Have ready a pastry bag fitted with a small (no. 6) plain tip. In a bowl, using a mixer on medium-low speed, beat together the egg whites and cream of tartar until very foamy. Slowly add the granulated sugar while beating. Increase the speed to high and beat until soft peaks form when the beaters are lifted. Continue until the whites hold stiff, shiny peaks. Sift the icing sugar over the whites and, using a rubber spatula, fold in until well blended.
  2. Scoop the mixture into the bag. On one baking sheet, pipe 48 stems, each ½ inch (12 mm.) wide at the base and tapering off to a point at the top, ¾ inch (2 cm.) tall, and spaced about ½ inch (12 mm.) apart. On the other sheet, pipe 48 mounds for the tops, each about 1-1/4 inches (3 cm.) wide and ¾ inch (2 cm.) high, also spaced ½ inch (12 mm.) apart. With a damp fingertip, gently smooth any pointy tips. Dust with cocoa. Reserve the remaining meringue.
  3. Bake until dry and firm enough to lift off the paper, 50-55 minutes. Set the pans on the counter and turn the mounds flat side up. With the tip of a knife, carefully make a small hole in the flat side of each mound. Pipe small dabs of the remaining meringue into the holes and insert the stems tip first. Return to the oven until completely dry, about 15 minutes longer. Let cool completely on the sheets.

My little mushroom forest. If you look close, you might just see a Smurf.


Filling and frosting the log
  1. Run a sharp knife around the edges of the genoise to loosen it from the pan.
  2. Turn the genoise layer over (unmolding it from the sheet pan onto a flat surface) and peel away the paper.
  3. Carefully invert your genoise onto a fresh piece of parchment paper.
  4. Spread with half the coffee buttercream (or whatever filling you’re using).
  5. A sprinkling of chopped hazelnuts before rolling adds a nutty crunch to the final product.

  6. Use the parchment paper to help you roll the cake into a tight cylinder.
  7. Transfer back to the baking sheet and refrigerate for several hours.
  8. Unwrap the cake. Trim the ends on the diagonal, starting the cuts about 2 inches away from each end.
  9. Position the larger cut piece on each log about 2/3 across the top.
  10. Cover the log with the reserved buttercream, making sure to curve around the protruding stump.
  11. Streak the buttercream with a fork or decorating comb to resemble bark.


  12. Transfer the log to a platter and decorate with your mushrooms and whatever other decorations you’ve chosen.

Chocolate-painted lemon leaves cooling.

December 19, 2007

Nuts for Pistachios

My favorite thing about pistachios (besides being tasty) is their visual appeal. I hand-shelled this bowl as I prepared to make some pistachio shortbread. It caught my eye because the color of the nuts just popped against the white of the bowl and the counter, the chartreuse green complemented by strokes of light-purple contrast. Offering a delicate and subtle flavor, pistachios are one of those rare foods that are appropriate for sweet and savory dishes alike.


Chocolate-Dipped Pistachio Shortbread

Adapted from this Martha Stewart recipe.

1/2 cup shelled pistachios
1/4 cup baker's sugar
1 1/4 cups all-purpose flour, plus more for rolling
1 1/2 sticks unsalted butter, chilled
1/2 cup granulated sugar
1/2 teaspoon pure vanilla extract
1/4 teaspoon salt
2 large egg yolks
1 large egg white, lightly beaten
6 ounces bittersweet chocolate morsels

  1. In the bowl of a food processor, grind pistachios by pressing the pulse button a handful of times until you have very small pieces. It's important to not overdo it as you will end up with a powder. Add half the pistachios to baker's sugar and and half to the flour.

  2. In a separate bowl, cream butter and sugar on medium speed (using the paddle attachment) until fluffy. Add vanilla and salt, and beat for 1 minute. Add yolks one at a time, and beat until evenly combined. Add flour and pistachio mixture, and mix until just combined. Remove dough, form into a rectangle; wrap in plastic and chill for 1 hour.

  3. Preheat oven to 350 degrees. Line two baking sheets with parchment paper, and set aside. On a lightly floured surface, roll out dough to a 1/8-inch thickness. Brush dough with the egg white to moisten. Cover evenly with pistachio-sugar mixture. Lightly press mixture into dough with the rolling pin. Using a small circular cookie cutter, cut cookies as close as possible to avoid waste. Place on prepared baking sheets.

  4. Bake until edges are just lightly golden, about 12 minutes. Transfer cookies to a cooling rack.

  5. When cooled, melt chocolate chips and dip one half of each cookie.


The original recipe indicated cooking time should be 18 minutes. This is what I ended up with after cooking for that long—burnt little discs that masked the nutty pistachio taste and simply weren't good. I reduced cooking time to 12 minutes and had much better results. Since oven temps can vary, cooking time should be adjusted accordingly.

December 14, 2007

Feed the Hungry By Increasing Your Vocab

Huh? How does increasing your vocabulary help feed the hungry? The folks at FreeRice started a website with a vocabulary game where they give you a word with four possible meanings and you pick the correct definition. For each word you get right, FreeRice donates 20 grains of rice through the United Nations to end world hunger.

If you're like me and question the legitimacy of just about everything, I bet you're wondering why they don't just donate the rice in the first place if they have a bunch of rice sitting around. The way it works is that when you play the game, advertisements appear on the bottom of your screen. The money from the ads buys the rice. See where the rice goes and then help feed the hungry.

December 12, 2007

Slow Down with Slow Food

Risotto is the epitome of comfort food—creamy, cheesy, yummy. But, making it is not for the fair-weather cook. You can't just crank the heat, cover the pan and walk away from the stove while your meal cooks. You have to hold risotto's hand, gently stirring and adding warm broth as you go. There are no shortcuts. But don't get me wrong. As some might like you to believe, it's not hard, it's just time-consuming. So, if your an over-achiever type and can't fathom the idea of hanging out in the kitchen, maximize your time with some leg lifts or glute squeezes or whatever while you hover over your risotto. Or, if you can, just enjoy the moment and take a few deep breaths while you savor the aroma.

Since risotto requires constant attention, I recommend chopping and measuring all your ingredients before you get started. This may not be a new practice for some, but I tend to wing it as I make my way through a recipe. It's not unusual for me to be digging around my spice cupboard looking for something I thought I had, but now can't find.

Common with most risotto recipes, this version called for butter. I am trying really hard to cut out butter fat, so just used olive oil. I didn't miss it at all and still managed to come up with a bowl of moist and creamy wonderfulness.

I should also add that I like to cook with Meyer lemons. They are sweeter than conventional lemons, so they add more flavor than tartness. If you can find them, try them.

A girl can't live on carbs alone (that's not to say I don't try), so I served this dish layering the risotto, then sauteed spinach, and topping with sliced Monte Cristo chicken.

Mangia!


Lemon Risotto
from Epicurious

6 cups canned low-salt chicken broth
3 1/2 tablespoons butter
1 1/2 tablespoons olive oil
2 large shallots, chopped
2 cups arborio rice or medium-grain white rice
1/4 cup dry white wine
1 cup freshly grated Parmesan cheese (about 3 ounces)
2 tablespoons chopped fresh parsley
2 tablespoons fresh lemon juice
4 teaspoons grated lemon peel

Bring broth to simmer in large saucepan over medium heat. Reduce heat to low; cover to keep warm. Melt 1 1/2 tablespoons butter with oil in heavy large saucepan over medium heat. Add shallots and sauté until tender, about 6 minutes. Add rice; stir 1 minute. Add wine and stir until evaporated, about 30 seconds. Add 1 1/2 cups hot broth; simmer until absorbed, stirring frequently. Add remaining broth 1/2 cup at a time, allowing broth to be absorbed before adding more and stirring frequently until rice is creamy and tender, about 35 minutes. Stir in cheese and remaining 2 tablespoons butter. Stir in parsley, lemon juice, and lemon peel. Season risotto with salt and pepper.

Pollo Monte Cristo
from Epicurious

1 tablespoon plus 1 1/2 teaspoon olive oil
4 boneless, skinless chicken breasts (about 6 ounces each)
Herbes de Provence
All-purpose flour (for dusting)
3 cloves garlic, sliced
1 shallot, chopped
1/4 cup dry white wine
1/4 cup chicken stock
Juice of 1/4 lemon
1 tablespoon butter
Julienned lemon zest (optional)

Heat oven to 375°F. Heat oil in a large ovenproof sauté pan over medium-high heat. Season chicken with salt, pepper and herbes de Provence. Dust with flour; tap off excess. Cook, meaty side down, 5 minutes. Turn over; cook 1 minute. Add garlic and shallot; stir 30 seconds. Add wine; cook 1 minute. Add stock; cook 30 seconds. Add lemon juice. Transfer pan to oven. Bake until chicken is cooked through, 9 to 13 minutes. Transfer chicken to cutting board. Place pan over medium heat; simmer sauce 1 minute. Add butter; swirl pan until butter incorporates and sauce thickens slightly. Cut each breast into 4 slices; transfer each to a plate; top with sauce and garlic. Serve with spinach; garnish with zest, if desired.


December 7, 2007

Summer Fare on a Winter's Night?

Nothing says summer like homemade ice cream. So, why then, is it 36° F outside and I have a hankering for ice cream? Not sure why, but I have always loved a tasty bowl of ice cream in the dead of winter. To satisfy this urge, I decided to whip up some homemade strawberry ice cream.

Strawberry Ice Cream
2 cups fresh ripe strawberries, stemmed and sliced
3 tablespoons freshly squeezed lemon juice
1 cup sugar, divided
1 cup whole milk
2 cups heavy cream
1 teaspoon pure vanilla extract

Combine the strawberries with the lemon juice and 1/3 cup of the sugar; stir gently and allow the strawberries to macerate in the juices for 2 hours.


In another bowl, use a hand mixer to combine the milk and granulated sugar until the sugar is dissolved. Stir in the heavy cream, the vanilla and any accumulated juices from the strawberries.


Turn on your ice cream maker (I use this Cuisinart model) and pour the mixture into the frozen bowl. Note: If you have a different machine, make sure you check your machine's instructions for the best results. Let mix until thickened, about 25-30 minutes.

Add the sliced strawberries during the last 5 minutes of freezing.


In contrast to its store-bought counterparts, this ice cream ends up being a light pink. It makes me wonder what the heck food companies are putting in their products.


Hated it! Can you tell?

December 6, 2007

Waste Not, Want Not


It's inevitable. No matter how carefully I plan my grocery shopping, I still find spoiled produce in the back of the fridge veggie drawer week after week. This drives me batty! Not only do I end up wasting perfectly good food, but I may as well be throwing money right into the garbage can. In an attempt to avoid both scenarios, I've adopted the philosophy that I cannot purchase any new produce if I still have some left in my fridge.

So, what does this have to do with anything? When making Portobello Stuffed Mushrooms earlier this week, I somehow bought twice as much fennel as I needed. Ever since, I have been eyeing the leftover fennel in the fridge, trying to figure out what the heck to do with it. I rarely cook with it, so was kind of at a loss. I scoured the internet for culinary inspiration and finally found something that seemed to meet my needs, penne pasta with sausage and fennel. Sounds tasty to me. The recipe took a little longer than I would have liked for a weeknight, but it turned out well and provided enough leftovers for at least one more meal for two.

Penne with Sausage and Fennel
from Food & Wine

2 tablespoons extra-virgin olive oil
1 medium onion, finely chopped
1 small carrot, finely chopped
1 small celery rib, finely chopped
1 tablespoon chopped sage
One 35-ounce can peeled Italian tomatoes, chopped
1 teaspoon tomato paste
2 tablespoons chopped basil
Salt and freshly ground pepper
1/2 pound Italian sweet sausage, pricked with a fork
1 large fennel bulb (1 1/2 pounds)--halved lengthwise, cored and sliced crosswise, fronds chopped
1 pound penne
1 tablespoon chopped parsley
2 tablespoons freshly grated Pecorino Romano cheese, plus more for serving

  1. Heat the olive oil in a medium saucepan. Add the onion, carrot, celery and sage and cook over low heat until the onion is softened but not browned, about 10 minutes. Add the tomatoes, tomato paste and 1 tablespoon of basil and season with salt and pepper. Cover and cook for 30 minutes.
  2. In a medium saucepan of water, simmer the sausage over moderate heat until cooked through, about 8 minutes. Drain, cut into 1/4-inch rounds and add to the tomato sauce.
  3. Cook the fennel slices in a large pot of boiling salted water until just tender, about 3 minutes. Using a slotted spoon, transfer them to the tomato sauce. Add the penne to the boiling water and cook, stirring occasionally, until al dente; drain and return to the pot. Add the tomato sauce, parsley and the fennel fronds and toss. Add the 2 tablespoons of cheese and the remaining 1 tablespoon of basil and toss again. Transfer the pasta to a warmed bowl and serve with the additional cheese.

Updated 3/2/2008
8 servings
Weight Watchers = 8 points per serving

December 2, 2007

Stuffed to the Gills

Or for our purposes, stuffed in place of the gills. With these stuffed portobello mushrooms, you remove the gills to make room for all the yummy goodies. Yummy, indeed!

I am normally a total carnivore. But even I like to keep it light every now and then by going vegetarian for an evening. This is one of my favorite all-veggie recipes and this is about the third time I've made it. It's not hard, but does take a little bit of time because of all the mincing involved. It's totally worth it, though, and consistently delivers a flavorful and satisfying meal. Tonight, I served it with tomatoes on a bed of arugula, drizzled with olive oil and balsamic and seasoned with a little salt and pepper.

To make this vegan, simply substitute bread crumbs for the cheese.


Portobello Mushrooms Stuffed with Spinach, Parmesan and Fennel
from Food to Live By

4 large portobello mushroom caps (about 1 1/2 pounds total)
1/4 cup olive oil, plus more for oiling the baking dish
1/2 cup finely minced shallots
1 1/2 cups finely minced fennel
4 cloves garlic, finely minced
6 ounces shiitake mushrooms, stems discarded, caps minced (about 1 cup)
12 ounces baby spinach, cut into ribbons (about 8 cups)
1/4 cup minced fresh flat-leaf parsley
3 tablespoons minced fresh tarragon
1 1/4 cups freshly grated Parmesan cheese
salt and freshly ground black pepper

  1. Wipe the portobello mushroom caps clean with a damp paper towel. Using a small paring knife or teaspoon, remove the gills to create a shallow depression for the stuffing. Place the portobellos on a lightly oiled baking dish and set aside.
  2. Position a rack in the center of the oven and preheat to 400 degrees F.
  3. Heat the olive oil in a large skillet over medium-low heat. Add the shallots and fennel and cook until soft, about 8 to 10 minutes.
  4. Add the garlic and shiitake mushrooms and cook until the moisture has evaporated, about 10 minutes. Stir in the spinach and cook until it wilts, about 5 minutes, working in batches, if necessary.
  5. Add the parsley, tarragon, and 1/2 cup of the Parmesan cheese and stir to combine. Cook until the cheese melts, about 1 minute. Season the filling with salt and pepper to taste.
  6. Spoon the filling into the portobellos, mounding it slightly. Sprinkle 3 tablespoons of the remaining Parmesan cheese over each mushroom. (The mushrooms can be prepared up to this stage 4 hours ahead. Refrigerate them, covered until ready to bake.)
  7. Bake the mushrooms until they are tender but not soggy and the cheese on top has browned, 20 to 25 minutes. Serve immediately.


Updated 3/2/2008
4 servings
Weight Watchers = 5 points per serving

December 1, 2007

All We are Saying is Give "Peas" a Chance

I admit it; I'm not really a fan of peas in their standard form and find them almost annoying. Those pesky, little green balls just roll around your plate, eluding your fork with every attempt at capturing a bite. And if you happen to have them on your plate in a restaurant, you have to figure out how to tactfully use your knife or finger (gasp) to corral a sufficient amount onto your fork.

What I can get on board with is eating my peas in the form of soup. There is something very comforting about a warm bowl of split pea soup and a nice hunk of warm sourdough bread. If you've ever driven I-5 in California traveling between the north and south parts of the state, you know what I mean. Pretty much everyone I know who has wearily traveled that route has stopped at Pea Soup Andersen's at least once for a bowl of their split pea soup. And most make it a regular pit-stop on their journeys. Thus the inspiration for today's recipe ... a nod to a Central California classic.


Savory Split Pea Soup with Ham and Pancetta
from Food to Live By

2 tablespoons olive oil
1/4 cup finely diced pancetta (about 3 ounces)
1 medium yellow onion, finely diced (about 3/4 cup)
1 celery rib, finely diced (about 1/4 cup)
2 small carrots, finely diced (about 1/2 cup)
1 bay leaf
2 cloves garlic, minced
2 cups dried split green peas, rinsed
3 cups low-sodium chicken broth
1 teaspoon salt, or more to taste
1 teaspoon dried thyme
1 cup diced smoked ham, such as Black Forest (about 5 ounces)
1 tablespoon balsamic vinegar
2 tablespoons sherry (optional)
fresh thyme leaves, for garnish


  1. Heat the olive oil in a large, heavy pot over medium heat. Add the pancetta and cook until it softens and begins to color, about 3 minutes. Add the onion, celery, carrots, and bay leaf and cook, stirring frequently, until the vegetables soften, 8 to 10 minutes. Add the garlic and cook until fragrant, about 1 minute longer.
  2. Add the split peas, stock and 3 1/2 cups of water to the pot and bring to a boil over high heat. Reduce the heat to low, cover the pot, and let simmer slowly, stirring occasionally for 30 minutes.
  3. Add the salt and thyme and continue cooking, partially covered, until the split peas are tender and have begun to break down slightly, about 30 minutes. Remove and discard the bay leaf. If you are not planning on serving the soup at this time, let it cool to room temperature. It can be refrigerated, covered, for up to 3 days or frozen for 2 months.
  4. Add the ham and let simmer until warmed through, about 5 minutes. Remove the soup from the heat and stir in the vinegar and sherry, if using. Serve the soup hot, sprinkled with thyme leaves.

Updated 3/2/3008
4 servings
Weight Watchers = 13 points per serving