April 29, 2008

Unexpected Elegance

Sometimes, things have a way of surprising you. Such is the case with the latest installment of Tuesdays with Dorie. Caitlin of Engineer Baker tasked the group with baking Fluted Polenta and Ricotta Cake this week. I knew I would like the cake. I mean, I luuurve polenta and I rather enjoy figs, so I wasn't worried about not liking it.


What I didn't anticipate was how gorgeous this simple dessert can be. The bold yellow of the polenta served as a nice backdrop for the figs peppered throughout the batter. The edges of the cake browned ever so slightly, showcasing the decorative edge formed by the fluted pan.

I stayed pretty true to Dorie's recipe, using dried mission figs and plumping them in boiling water for a minute or so. It’s good to do this with any dried fruit when baking, as it keeps the fruit moist. The figs I used weren’t huge, but I did cut most of them in half for a more uniform distributiuon in the pan. Next time, I would consider cutting them into quarters, as my resident taster found the halves to be too overpowering.
Dorie writes that the butter you add on top in the step before baking will leave light circles when you take it out of the oven. Mine left little divots, almost like someone had repeatedly poked their thumb into the surface. It’s not terrible looking, just not quite what I expected. It actually gave the cake some rustic charm. I'd probably just leave the butter off the top next time, though, to save time. I don't imagine (though I'm no expert) that it would affect the end result all that much.

For a finished look, I dusted the cake with powdered sugar. Per Dorie's suggestion, I served it with fresh whipped cream lightly sweetened with honey.

Visually, this cake exudes an unexpected and understated elegance. I think it would be the perfect dessert for a barbecue on a summer's night or an afternoon tea party with girlfriends.

In the future, I think I'd like to experiment with cherries or strawberries instead of figs. Also, the other day in the store, lavender honey caught my eye. It got me thinking that a lavender and raspberry combination could be intriguing.
Check out more polenta cake action.


Fluted Polenta and Ricotta Cake

About 16 moist, plump dried Mission or Kadota figs, stemmed
1 c. medium-grain polenta or yellow cornmeal
½ c. all-purpose flour
1 tsp baking powder
1 c. ricotta
1/3 c. tepid water
¾ c. sugar
¾ c. honey (if you’re a real honey lover, use a full-flavored honey such as chestnut, pine, or buckwheat)
Grated zest of 1 lemon
2 large eggs
Getting Ready:
Center a rack in the oven and preheat the oven to 325 degrees F. Butter a 10 ½-inch fluted tart pan with a removable bottom and put it on a baking sheet lined with parchment or a silicone mat.

Check that the figs are, indeed, moist and plump. If they are the least bit hard, toss them into a small pan of boiling water and steep for a minute, then drain and pat dry. If the figs are large (bigger than a bite), snip them in half.

Whisk the polenta, flour, baking powder, and salt together.

Working with a stand mixer fitted with the whisk attachment or with a hand mixer in a large bowl, beat the ricotta and water together on low speed until very smooth. With the mixer at medium speed, add the sugar, honey, and lemon zest and beat until light. Beat in the melted butter, then add the eggs one at a time, beating until the mixture is smooth. Reduce the mixer speed to low and add the dry ingredients, mixing only until they are fully incorporated. You’ll have a sleek, smooth, pourable batter.

Pour about one third of the batter into the pan and scatter over the figs. Pour in the rest of the batter, smooth the top with a rubber spatula, if necessary, and dot the batter evenly with the chilled bits of butter.

Bake for 35 to 40 minutes, or until a thin knife inserted into the center of the cake comes out clean. The cake should be honey brown and pulling away just a little from the sides of the pan, and the butter will have left light-colored circles in the top. Transfer the cake to a rack and remove the sides of the pan after about 5 minutes. Cool to warm, or cool completely.

April 27, 2008

There Should be More Foods on Sticks

Portable food doesn't get enough credit. While it may seem a bit tedious, it is quite smart to offer food on a stick for a number of reasons. Smaller usually means cuter. You can get a sampling of something without committing to a traditional serving size. And, you don't need a plate or utensils.


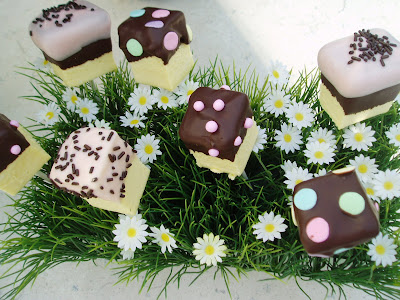
This month's Daring Bakers recipe came from our hosts Elle from Feeding My Enthusiasms and Deborah from Taste and Tell. They challenged us to use a specific cheesecake pop recipe and put our personal stamp on the decorating. It's almost as if we all get the same simple canvas to start and we can create the art that best fits our personality.

My biggest obstacle was figuring out how to shape the pops without making a mess of them, as well as come up with a creative way to decorate them. I decided to cut these into cubes for a more structural feel. For dipping, I used a combination of dark chocolate and white chocolate that I made light pink. Embellishments included chocolate jimmies, pink large dragees and large confetti sprinkles. My favorite combination was a two-toned version. First, I dipped about 3/4 of the cheesecake in the chocolate. I popped them in the freezer for about 5 minutes, then dipped it about 1/4 of the way into the light pink. I topped it off with chocolate jimmies. The result resembled a whimsical cupcake.

I admit that I probably would never have selected a recipe like this on my own. However, after making this one, I would definitely do it again. It was a lot of fun and allowed for personal expression. Thanks to Elle and Deborah for a challenge that made me feel like a kid again.

Cheesecake Pops
from Sticky, Chewy, Messy, Gooey by Jill O'Connor

Makes 30 – 40 Pops

Ingredients
5 8-oz. packages cream cheese at room temperature
2 cups sugar
¼ cup all-purpose flour
¼ teaspoon salt
5 large eggs
2 egg yolks
2 teaspoons pure vanilla extract
¼ cup heavy cream
Boiling water as needed
Thirty to forty 8-inch lollipop sticks
1 pound chocolate, finely chopped – you can use all one kind or half and half of dark, milk, or white (Alternately, you can use 1 pound of flavored coatings, also known as summer coating, confectionery coating or wafer chocolate – candy supply stores carry colors, as well as the three kinds of chocolate. White chocolate is harder to use this way, but not impossible)
2 tablespoons vegetable shortening
Assorted decorations such as chopped nuts, colored jimmies, crushed peppermints, mini chocolate chips, sanding sugars, dragees) - Optional


Instructions
Position oven rack in the middle of the oven and preheat to 325 degrees F. Set some water to boil.
In a large bowl, beat together the cream cheese, sugar, flour, and salt until smooth. If using a mixer, mix on low speed. Add the whole eggs and the egg yolks, one at a time, beating well (but still at low speed) after each addition. Beat in the vanilla and cream.

Grease a 10-inch cake pan (not a springform pan), and pour the batter into the cake pan. Place the pan in a larger roasting pan. Fill the roasting pan with the boiling water until it reaches halfway up the sides of the cake pan. Bake until the cheesecake is firm and slightly golden on top, 35 to 45 minutes.

Remove the cheesecake from the water bath and cool to room temperature. Cover the cheesecake with plastic wrap and refrigerate until very cold, at least 3 hours or up to overnight.

When the cheesecake is cold and very firm, scoop the cheesecake into 2-ounce balls and place on a parchment paper-lined baking sheet. Carefully insert a lollipop stick into each cheesecake ball. Freeze the cheesecake pops, uncovered, until very hard, at least 1 – 2 hours.
When the cheesecake pops are frozen and ready for dipping, prepare the chocolate. In the top of a double boiler, set over simmering water, or in a heatproof bowl set over a pot of simmering water, heat half the chocolate and half the shortening, stirring often, until chocolate is melted and chocolate and shortening are combined. Stir until completely smooth. Do not heat the chocolate too much or your chocolate will lose it’s shine after it has dried. Save the rest of the chocolate and shortening for later dipping, or use another type of chocolate for variety.

Alternately, you can microwave the same amount of chocolate coating pieces on high at 30 second intervals, stirring until smooth.

Quickly dip a frozen cheesecake pop in the melted chocolate, swirling quickly to coat it completely. Shake off any excess into the melted chocolate. If you like, you can now roll the pops quickly in optional decorations. You can also drizzle them with a contrasting color of melted chocolate (dark chocolate drizzled over milk chocolate or white chocolate over dark chocolate, etc.) Place the pop on a clean parchment paper-lined baking sheet to set. Repeat with remaining pops, melting more chocolate and shortening (or confectionery chocolate pieces) as needed.

Refrigerate the pops for up to 24 hours, until ready to serve.

April 22, 2008

Celebrating a Slice of Life

Today is my mom's birthday. To help her celebrate, I knew I wanted to make her a cake. What I didn't know is what kind. Well, it just so happened that this week's Tuesdays with Dorie recipe ended up being a cake. A big ol' carrot cake, in fact. Lucky for me, my mom loves carrot cake and she was on board with me baking this for her. I took a quick mental inventory and realized that I had never made a carrot cake in my life. So, I trudged forward with no expectations as to how this one would shake out.

Part of me loves to experiment with recipes, but others are best left alone. After reading through the ingredients and directions a few times, I decided that this was a cake best prepared as instructed. The only modification I made was with the frosting. I had to double the frosting recipe, which kind of surprised me. I was very careful to use a minimal amount of frosting between the layers. By the time I had frosted and stacked the layers, I had hardly any frosting left. So, I took it apart, made a second batch of frosting and re-frosted—this time being a little more generous in between layers. I'm still a little perplexed because I got the impression that while Dorie didn't frost the sides of her cake, the recipe still yielded enough to cover the whole thing.

To garnish, I candied thin strips of carrot until translucent and made a sort of ribbon design. I was going for the same look as a Martha Stewart carrot cake I saw recently. Mine was not quite as impressive (read not even close), but I think I got the hang of it and could do a better job the next time around.

As for the taste, this cake was insanely good. The cake itself was flavorful and moist, I'm assuming a result of the 1 cup of oil (gasp). The frosting was rich, rich, rich. It tasted like carrot cake frosting I have had before, but definitely more fresh. Perhaps the lemon juice? One moderate slice of this cake was enough to satiate my sweet tooth.

The final verdict came down from the guest of honor and she gave it the big "thumbs up." Kudos to Amanda of slow like honey for selecting this week's treat. Check out more carrot cakes.

Bill's Big Carrot Cake

Yields 10 servings

For the cake
2 cups all purpose flour
2 teaspoons baking powder
2 teaspoons baking soda
2 teaspoons ground cinnamon
¾ teaspoon salt
3 cups grated carrots (about 9 carrots, you can grate them in food processor fitted with a shredding a blade or use a box grater)
1 cup coarsely chopped walnuts or pecans
1 cup shredded coconut (sweetened or unsweetened)
½ cup moist, plump raisins (dark or golden) or dried cranberries
2 cups sugar
1 cup canola oil
4 large eggs

For the frosting
8 ounces cream cheese, room temperature
1 stick (8 tablespoons) unsalted butter, at room temperature
1 pound or 3 ¾ cups confectioners' sugar, sifted
1 tablespoon fresh lemon juice or ½ teaspoon pure lemon extract
½ cup shredded coconut (optional)
Finely chopped toasted nuts and/or toasted shredded coconut (optional)

Getting ready
Position the racks to divide the oven into thirds and preheat the oven to 325 degrees Fahrenheit. Butter three 9-x-2-inch round cake pans, flour the insides, and tap out the excess. Put the two pans on one baking sheet and one on another.

To make the cake
Whisk the flour, baking powder, baking soda, cinnamon and salt. In another bowl, stir together the carrots, chopped nuts, coconut, and raisins.

Working with a stand mixer, preferably fitted with a paddle attachment, or with a hand mixer in a large bowl, beat the sugar and oil together on a medium speed until smooth. Add the eggs one by one and continue to beat until the batter is even smoother. Reduce the speed to low and add the flour mixture, mixing only until the dry ingredients disappear. Gently mix the chunky ingredients. Divide the batter among the baking pans.

Bake for 40-50 minutes, rotating the pans from top to bottom and front to back at the midway point, until a thin knife inserted into the centers comes out clean. The cakes will have just started to come away from the sides of the pans. Transfer the cakes to cooling racks and cool for about 5 minutes, then run a knife around the sides of the cakes and unmold them. Invert and cool to room temperature right side up.

The cakes can be wrapped airtight and kept at room temperature overnight or frozen for up to 2 months.

To make the frosting
Working with a stand mixer, preferably fitted with a paddle attachment or with a hand mixer in a large bowl, beat the cream cheese and butter together until smooth and creamy. Gradually add the sugar and continue to beat until the frosting is velvety smooth. Beat in the lemon juice or extract.

If you'd like coconut in the filling, scoop about half of the frosting and stir the coconut into this position.

To assemble the cake
Put one layer top side up on a cardboard cake round or a cake plate protected by strips of wax or parchment paper. If you added the coconut to the frosting, use half of the coconut frosting to generously cover the first layer (or generously cover with plain frosting). Use an offset spatula or a spoon to smooth the frosting all the way to the edges of the layer. Top with the second layer, this time placing the cake stop side down, and frost with the remainder of the coconut frosting or plain frosting. Top with the last layer, right side up, and frost the top- and the sides- of the cake. Finish the top with swirls of frosting. If you want to top the cake with toasted nuts or coconut, sprinkle them on now while the frosting is soft.
Refrigerate the cake for 30 minutes, just to set the frosting before serving.

Serving
This cake can be served as soon as the frosting is set. It can also wait, at room temperature and covered with a cake keeper overnight. The cake is best served in thick slices at room temperature and while it's good plain, it's even better with vanilla ice cream or some lemon curd.
Storing
The cake will keep at room temperature for 2 to 3 days. It can also be frozen. Freeze it uncovered, then when it's firm, wrap airtight and freeze for up to 2 months. Defrost, still wrapped, overnight in the refrigerator.

April 15, 2008

My Kitchen Carnage

My ego usually gets the better of me when it comes to posting to my blog. I've never posted any recipe that had a less than decent outcome. Today, however, I had a choice to make. This week's Tuesdays with Dorie recipe and I got into a fight. I'm not sure who won, but it ended ugly. (You'll see what I am talking about in a minute.) In the end, I figured there's no harm in sharing kitchen failures. I have to believe everyone, whether or not they admit it, has had at least one baking debacle. Here's one for the Fail record books.

Judy of Judy's Gross Eats selected marshmallows from the popular Dorie baking tome, Baking: From My Home to Yours, for this week's Tuesdays with Dorie recipe. It seemed easy enough and I felt fairly confident that I would be in and out of the kitchen in no time, and snacking on my newly made marshmallows.

I'm not sure when the breakdown occurred, but my guess is that it started with the whipping of the egg whites. I must not have been paying attention because I never saw the stiff peaks as indicated in the directions. I stopped whisking because the egg seemed to be separating. I should have left it alone at that point, but wanted to experiment a little and added some macerated strawberries. Enter second breakdown. The mixture seemed to set up, but when I cut into it, it didn't have the consistency of marshmallow. The texture was somewhat spongy and the taste? Eggy. Realizing that these would never make it as marshmallows, I spooned it into a bowl, hopeful that I could repurpose the gelatinous mess into another recipe.

In the end, I just tossed it.

So, there you are. The marshmallows that would never be.


I originally planned to give it another go before posting day, but I came down with a nasty cold and I'm just not feeling the culinary love right now. I hope to get back in the marshmallow saddle in the next week or so.

I'm optimistic that I can get it right next time, but really ... it can't get any uglier. For now, check out some good-looking marshmallows from the other Tuesday with Dorie bakers.

Tell me about one of your kitchen blunders so I don't feel so bad.

More Dorie recipes I've made from Baking: From My Home to Yours
Fresh Tangelo Cream Tart
Gooey Chocolate Cakes
Perfect Party Cake
Brioche Raisin Snails
Russian Grandmothers' Apple Pie-Cake
Snickery Squares
Pecan Sour Cream Biscuits
Almost-Fudge Gâteau

April 11, 2008

A Toast to the Host

When having overnight company or hosting a brunch, the last thing I want to do is peel my eyes open at "o'dark thirty" and spend all morning in the kitchen trying to whip together a meal.

I recently hosted six for breakfast and my main objective was to keep the prep work to a minimum, but make the meal memorable.

When I came across this recipe for a french toast casserole, I was immediately drawn to the praline topping. I mean, french toast is good, but that topping sounded sinful. What's more, the directions couldn't be easier.

I didn't have pecans, so used hazelnuts. It was a fine substitute. Also, there is absolutely no need for the maple syrup, in my opinion. The bread bakes beautifully and the praline topping adds enough sweetness to satisfy even the biggest sugar addict.

The only issue I hold with this dish is the amount of butter (two sticks!) in the praline. Butter makes everything better, but it also makes the back side bigger. I have to remind myself that this is a Paula Deen recipe. Anyone who knows her cooking, knows that butter is the cornerstone of many of her recipes. So, I guess I knew that going into it. But, I also don't think I will serve this on a regular basis. My pants are already too tight.

Baked French Toast Casserole with Maple Syrup
from Food Network courtesy of Paula Deen

6 to 8 servings

1 loaf French bread (13 to 16 ounces)
8 large eggs
2 cups half-and-half
1 cup milk
2 tablespoons granulated sugar
1 teaspoon vanilla extract
1/4 teaspoon ground cinnamon
1/4 teaspoon ground nutmeg
Dash salt
Praline Topping, recipe follows
Maple syrup

Slice French bread into 20 slices, 1-inch each. (Use any extra bread for garlic toast or bread crumbs). Arrange slices in a generously buttered 9 by 13-inch flat baking dish in 2 rows, overlapping the slices. In a large bowl, combine the eggs, half-and-half, milk, sugar, vanilla, cinnamon, nutmeg and salt and beat with a rotary beater or whisk until blended but not too bubbly. Pour mixture over the bread slices, making sure all are covered evenly with the milk-egg mixture. Spoon some of the mixture in between the slices. Cover with foil and refrigerate overnight.
The next day, preheat oven to 350 degrees F.

Spread Praline Topping evenly over the bread and bake for 40 minutes, until puffed and lightly golden. Serve with maple syrup.
Praline Topping:
1/2 pound (2 sticks) butter
1 cup packed light brown sugar
1 cup chopped pecans
2 tablespoons light corn syrup
1/2 teaspoon ground cinnamon
1/2 teaspoon ground nutmeg

Combine all ingredients in a medium bowl and blend well. Makes enough for Baked French Toast Casserole.

April 8, 2008

Taken with Tangelos

Mary of Starting from Scratch chose this week's Tuesdays with Dorie recipe. Actually, she deferred the honors to her friend, Teri, who was celebrating a birthday. What a good friend! Being such generous ladies, they gave us a choice between Dorie's Most Extraordinary French Lemon Cream Tart or her Fresh Orange Cream Tart.

I decided to go for the orange version because I've ogled blood oranges in my grocery store for years. I'd never bought any and really never had a reason to until now. So, I gleefully headed to the store, thinking how exciting it would be to finally add blood oranges to the list of ingredients with which I have baked. As luck—or the lack thereof—would have it, my favorite store was all out of blood oranges. According to the produce guy, they recently got a shipment, but the quality was not their standards. I appreciate the effort, but hey, Produce Guy, "Boooo. Hissss."

Unsure of my next move at that point, something near the oranges caught my eye. Deep red-orange orbs, emitting a subtle citrus scent into the air. Minneola tangelos ... okay, this might just work.

And work it did. A cross between a sweet tangerine and a tart grapefruit, the Minneola produces a super juicy nectar. The perfect foundation for a citrus tart.

While I consider this baking adventure an ultimate victory, it didn't come without its challenges. I was never able to get the cream to 180 degrees F while stirring over heat. The directions indicate that the process would take about 10 minutes. After laboriously whisking for more than 30 minutes, my cream never reached more that 150-ish. I later found out from some fellow TWDers that I might've had better luck had I used a metal bowl instead of a glass one. That's lesson #1. Lesson #2 came from Julius at Occasional Baker, who shared a great tip he learned. Over-zealous whisking can prohibit one's cream from reaching the desired temperature. It turns out that stirring with a spatula is the preferred method and allows the cream to heat up more quickly.

I got zero pictures of an individual slice, so I unfortunately can't share a cross-section. This tart plated terribly for me, and looked just plain sloppy. The fault doesn't lie within the tart, though, but in my lack of grace when it comes to slicing baked goods. I've never done this well in the past and my efforts with this tart were no exception.

Would I make it again? Probably. The cream was very smooth and rich, it was almost too rich. Between the crust and the cream, this tart boasts 17 tablespoons of butter. I'm a superfan of all things decadent, but even I have my limits. I'd like to experiment with the recipe and see if I could reduce the amount of butter and still procure a decent cream.


Fresh Tangelo Creme Tart
slightly modified from Dorie Greenspan's original recipe for Fresh Orange Cream Tart

For the custard filling
1 cup sugar
Grated zest of 3 tangelos
Grated zest of 1 lemon
4 large eggs
Scant 3/4 cup fresh tangelo juice
3 tablespoons fresh lemon juice
1 1/4 teaspoons unflavored gelatin
1 tablespoon cold water
2 3/4 sticks (11 ounces) unsalted butter, cut into tablespoon-size pieces, at cool room temperature

1 9-inch Spiced Tart Dough shell, fully baked and cooled (see below)

orange slices and zest spirals, for decoration

For the crust
1 cup ground hazelnuts
1 cup all-purpose flour
1 tablespoon unsweetened cocoa powder
1 teaspoon cinnamon
1/4 teaspoon salt
Pinch of ground cloves
1 large egg yolk
1 tablespoon water
3/4 stick (6 tablespoons) unsalted butter, at room temperature
6 tablespoons sugar

Getting ready
Have an instant-read thermometer, a strainer and a blender (first choice) or food processor at hand. Bring a few inches of water to a simmer in a saucepan.

To make the cream
Put the sugar and tangelo and lemon zest in a large heatproof bowl that can be set over the pan of simmering water. Off the heat, rub the sugar and zests together between your fingertips until the sugar is moist, grainy and very aromatic. Whisk in the eggs, followed by the tangelo and lemon juice.

Set the bowl over the pan and start stirring with the whisk as soon as the mixture feels tepid to the touch. You want to cook the cream until it reaches 180 degrees F. As you whisk—you must whisk constantly to keep the eggs from scrambling—you'll see that the cream will start out light and foamy, then the bubbles will get bigger and then, as it gets closer to 180 degrees F, it will start to thicken and the whisk will leave tracks. Heads up at this point—the tracks mean the cream is almost ready. Don't stop whisking or checking the temperature, and have patience—depending on how much heat you're giving the cream, getting to temp can take as long as 10 minutes.

As soon as it reaches 180 degrees F, remove the cream from the heat and strain it into the container of the blender (or food processor); discard the zest.

Soften the gelatin in the cold water, then dissolve it by heating it for 15 seconds in a microwave oven (or do this in a saucepan over extremely low heat). Add the gelatin to the filling and pulse once just to blend, then let filling cool to 140 degrees, about 10 minutes.

Turn the blender to high (or turn on the processor) and, with the machine going, add the butter about 5 pieces at a time. Scrape down the sides of the container as needed as you incorporate the butter. Once the butter is in, keep the machine going—to get the perfect light, airy texture, you must continue to blend the cream for another 3 minutes. If your machine protests and gets a bit too hot, work in 1-minute intervals, giving the machine a little rest between beats.

Pour the cream into a container, press a piece of plastic wrap against the surface and refrigerate for at least 4 hours. (The cream can be refrigerated, tightly covered, for up to 5 days or frozen for up to 2 months; thaw overnight in the fridge.)

When you are ready to construct the tart, whisk the cream vigorously to loosen it. Spread the cream evenly in the crust. Arrange the orange slices and zest spiral in the center of the tart. Serve now or refrigerate the tart until needed.

To make the crust
Butter a 9-inch fluted tart pan with a removable bottom.

Whisk together the ground nuts, flour, cocoa, cinnamon, salt and cloves. With a fork, stir the egg yolk and water together in a cup.

Working with a stand mixer, preferably fitted with a paddle attachment, or with a hand mixer in a large bowl, beat the butter and sugar together at medium speed until smooth, about 3 minutes, scraping down the bowl as needed. Add the egg and water and beat for 1 minute more. Reduce the speed to low and add the dry ingredients, mixing only until they disappear into the dough. Don't work the dough much once the flour is incorporated. If the dough comes together but some dry crumbs remain at the bottom of the bowl, stop the mixer and finish blending the ingredients with a rubber spatula or your hands.

With your hands, flatten the dough into a disk, then grab a rolling pin and roll the dough, turning it over frequently, until you have a round that is about 11 inches in diameter.

Carefully turn the dough into the buttered tart pan. Very gently fit the dough into the pan, lightly pressing it over the bottom and up the sides of the pan. Don't be concerned if the dough breaks, as it may—just gently press the tears together with your fingers. Chill the dough, covered with plastic wrap, for at least 2 hours.

Center a rack in the oven and preheat the oven to 375 degrees F. Line a baking sheet with parchment or a silicone mat.

Remove the plastic wrap and, using a small sharp knife, trim the excess dough flush with the edges of the pan. Butter the shiny side of a piece of aluminum foil, fit the foil, buttered side down, tightly against the crust and fill with dried beans or rice or pie weights.

Place the tart pan on the baking sheet. Bake for 20 minutes. Remove the foil and weights and bake the crust for an additional 8 to 10 minutes, or until it is browned, dry and firm. Transfer to a rack and cool to room temperature before filling.

April 5, 2008

There's A Fungus Among Us

It is said that ancient Egyptians believed mushrooms to be the plant of immortality, decreeing mushrooms only for royalty. Commoners, no fungus for you! Other historical accounts explain that many believed mushrooms to have properties that could produce super-human strength, help in finding lost objects and lead the soul to the realm of the gods. This, all according to the Mushroom Council, may be mushroom folklore, but it would be kind of cool if it were true. I could use some help finding all sorts of lost objects. One thing is for sure. Mushrooms are t-a-s-t-y. Their meaty texture and flavor make them a perfect filling substitute for beef or chicken. For those nights you want something substantial, but you don't have the stomach for a heavy meaty meal, choose mushrooms. I found this great vegetarian ravioli. Swimming in a pool of green pea purée, these pillows of mushroom are the perfect foundation to a spring dinner.


Mushroom Ravioli with Green Pea Purée
from Vegetarian Times

Mushroom Ravioli
2 Tbs. olive oil
1/2 small onion, chopped (1/2 cup)
1 clove garlic, minced (1 tsp.)
1/2 tsp. chopped fresh thyme
8 oz. wild mushroom mix or assorted mushrooms, chopped (3 cups)
2 Tbs. sherry
24 won ton wrappers

Green Pea Purée
2 cups frozen peas, thawed
3/4 cup low-sodium vegetable broth
2 Tbs. grated Parmesan cheese, plus more for garnish, if desired


  1. To make Mushroom Ravioli: Heat oil in skillet over medium-high heat. Add onion, and cook 5 to 7 minutes, or until translucent and starting to brown. Stir in garlic and thyme, and cook 1 minute more. Add mushrooms, and increase heat to high. Sauté mushrooms 7 minutes, or until all liquid has evaporated. Add sherry to pan and cook 1 minute, or until sherry has evaporated. Transfer to bowl, and cool 20 minutes.

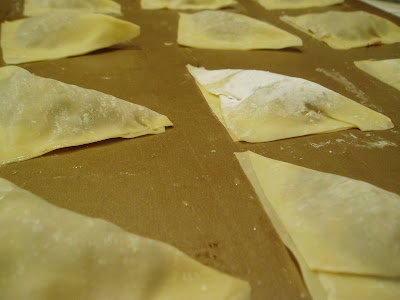
  2. Place 1 won ton wrapper on work surface. Brush edges with water. Spoon 1 tsp. mushroom mixture in center of wrapper and fold into triangle, pressing edges to seal. Repeat with remaining wrappers and mushroom mixture.


  3. To make Green Pea Purée: Blend peas, broth, and cheese in blender until smooth. Transfer to saucepan, and warm over medium heat. Season with salt and pepper, and set aside.

  4. Bring large pot of salted water to a boil over high heat. Add ravioli and cook 2 minutes, or until cooked through. Drain. Spoon pea purée onto plates, and top with ravioli. Sprinkle with Parmesan cheese, if desired.