It's been many months since I've paid attention to my poor little blog. Unfortunately, I have experienced some personal circumstances recently that have left me unable to cook or bake, and therefore blog. It looks like things are settling down now and I am happy to be back, and ready to give my blog some TLC.
If you've been patiently waiting, I thank you. If you are new to my blog, stay tuned. I'm no master chef, but I have been told that I am one wicked home cook... I'll take that.
February 6, 2009
Back in the Saddle Again
October 5, 2008
Dare to Eclair!
I was out of commission for the past month—and subsequently out of the kitchen—because I tore some ligaments in my foot at the very beginning of September. It's a very stupid story, so let's just pretend I fell while skiing in Vail or something exciting like that.
With time and some physical therapy under my belt, I'm on the mend now. That's all fine and good, but I've barely been in the kitchen this month and really only out of necessity to keep my family fed. (Shhhh, don't tell, but we ordered more than our share of take-out pizza this past month.) Not only have I not been in the kitchen, my poor little blog has bore the brunt of my injuries and has been postless for too long.
So, I am playing a little catch-up with the Daring Bakers, who baked some gorgeous eclairs back at the end of August. I actually baked mine back then too, but wasn't able to post on time and then had my spill, and well ... you know. So, better late than never, here are the fruits of my eclair labor.
First, a big thank you (albeit very belated) to Meeta K of What's for Lunch, Honey? and Tony from Olive Juice for hosting the August challenge. The very premise of Daring Bakers is to challenge yourself to try something new and out of your comfort zone. I definitely would not have tried to make eclairs had it not been for their selection, so I was pleased to try something new.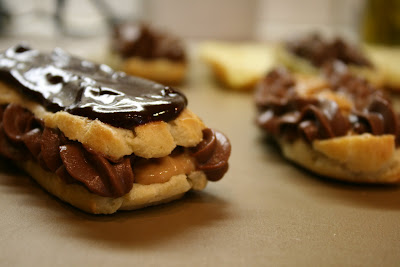 Eclairs consist of three elements:
- Pâte à choux, also known as choux pastry or cream puff dough
- Pastry cream
- Chocolate glaze
 For the complete recipe, visit Meeta's blog.

August 1, 2008
Fennel Gets its Due
 One vegetable that all to often gets the proverbial diss is fennel.
People are always asking me what they can possibly do with it and how they can mask the strong taste.
If you're unfamiliar with fennel, it is a type of plant with an edible bulb, which resembles pale celery—only shorter and fatter. The taste is similar to a very mild black licorice. Rich in fiber and antioxidants, fennel is a versatile addition to cooking often found in soups and salads.
As a fan of fennel, I prefer to make it the star of a dish, rather than try to cover it up with other flavors. With just a handful of ingrendients, most of which I have onhand at any given time, I threw together some quick pan-fried fennel a la Martha Stewart. I had saved a recipe for Green Garlic Dip a while ago and have been trying to figure out how I could include it in or with a dish.
The two went together great and made a perfect summer appetizer. Everyone tried some and I didn't get one complaint (and my group doesn't mince words). The fennel had a nice crunch that paired nicely with the bread crumb coating and the fresh, subtle flavor of the green garlic.
Pan-Fried Fennel
from Martha Stewart
2 medium fennel bulbs
1 cup all-purpose flour, for dredging
1 1/2 cups fresh bread crumbs, for dredging
2 teaspoons coarse salt, plus more for seasoning
3/4 teaspoon freshly ground pepper, plus more for seasoning
3 large eggs
1 1/2 cups vegetable oil, just enough to yield about 1/4 inch in the pan2 lemons, cut into wedges One recipe Green Garlic Dip
Remove tops and fronds from fennel bulbs. Slice each bulb in half widthwise. Cut each half into slices about 1/8 inch thick.
Pour flour into a medium bowl and bread crumbs into another. Season with the salt and pepper. Crack eggs into a third bowl; whisk until frothy. Season with salt and pepper. Dredge fennel lightly in flour, then in egg, and then in bread crumbs, shaking off excess after each step.
Heat oil in a large saute pan over medium heat. Check to make sure the oil is hot enough by tossing a pinch of flour into the pan. If the flour sizzles, the oil is ready.
Fry fennel slices until golden brown on each side, about 30 seconds per side, working in batches so as not to crowd pan. Drain on paper towels; season with salt. Serve hot with Green Garlic Dip (recipe follows).
 Green Garlic Dip
from Daniel Patterson, chef and owner of Coi in San Francisco
¾ cup minced green garlic, white and light green parts only
1 egg
2 teaspoons sherry vinegar
1 tablespoon plus 1 teaspoon red-wine vinegar
6 tablespoons fruity extra-virgin olive oil
½ cup pure olive oil
Salt
In a blender, purée the egg, vinegars and cooled green garlic on medium-high. With the blender running, add the oils in a slow, steady stream to emulsify. Season with salt.
July 30, 2008
Praline Dreams
 Hang on to your knickers! Today is posting day for the month of July for the Daring Bakers.
Get ready for some serious sinful eating with more Filbert Gateau with Praline Buttercream than your mouth can handle.
Chris from Mele Cotte, selected this month's challenge. At first blush, this one seemed like it would be time-consuming than challenging. Oh, how naive of this particular Daring Baker. For the most part, things went well. But, that was short-lived when it came time to glaze with the chocolate. I knew the layers had to be pretty even in order to create a smooth finished product. I thought I would even out my slightly uneven layers by smoothing some leftover buttercream into the seams on the sides. "How clever am I?" I thought. What I didn't take into consideration is that hot chocolate glaze poured over buttercream would melt the buttercream. Duh!? It seems so obvious now, but I had to act quickly and patch up my mess. For the most part, I was able to save the cake, but there were some obvious patches of tan where the buttercream and chocolate melted together. Not too big of a disaster, but a lesson learned on my part.
Daring Baker challenge turned birthday cake
The recipe calls for a large amount of skinned and toasted hazelnuts. All I could find were hazelnuts in the skin, so I wondered how the heck I was going to skin all these little buggers. Neha from The Literate and Liberal Foodie came across this great tip for removing hazelnut skins and shared it with the rest of the group. If you follow the tip, make sure you use a very large stock pot. I used my smaller one at first and the baking soda bubbled up and over the sides all over my stove. I quickly poured everything into my big-daddy stock pot and had a heck of a mess on my stove to clean after.
 For the most part, I followed the recipe as written. However, I did make a few minor modifications just to use up some ingredients I happened to already have in the house:
- Chambord (black raspberry liqueur) everywhere the recipe called for rum or Grand Marnier
- Raspberry preserves in the glaze instead of apricot
And I did overlook accidentally the requirement that said we had to use buttercream as part of the garnish. I thought it was optional and I like drama, so made these candied hazelnuts instead.


Filbert Gateau with Praline Buttercream
From Great Cakes by Carol Walter
From Great Cakes by Carol Walter
1 Filbert Genoise
1 recipe sugar syrup, flavored with dark rum
1 recipe Praline Buttercream
½ cup heavy cream, whipped to soft peaks
1 recipe Apricot Glaze
1 recipe Ganache Glaze, prepared just before using
3 tablespoons filberts, toasted and coarsely chopped
For the Filbert Genoise
Because of the amount of nuts in the recipe, this preparation is different from a classic genoise.
1 ½ cups hazelnuts, toasted/skinned
2/3 cup cake flour, unsifted
2 Tbsp. cornstarch
7 large egg yolks
1 cup sugar, divided ¼ & ¾ cups
1 tsp. vanilla extract
½ tsp. grated lemon rind
5 lg. egg whites
¼ cup warm, clarified butter (100 – 110 degrees)
Position rack in the lower 3rd of the oven and preheat to 350 degrees. Grease and flour a 10” X 2” inch round cake pan.
Using a food processor, process nuts, cake flour, and cornstarch for about 30 seconds. Then, pulse the mixture about 10 times to get a fine, powdery mixture. You’ll know the nuts are ready when they begin to gather together around the sides of the bowl. While you want to make sure there aren’t any large pieces, don’t over-process. Set aside.
Put the yolks in the bowl of an electric mixer, with the whisk attachment, and beat until thick and light in color, about 3-4 minutes on med-high speed. Slowly, add ¾ cup of sugar. It is best to do so by adding a tablespoon at a time, taking about 3 minutes for this step. When finished, the mixture should be ribbony. Blend in the vanilla and grated lemon rind. Remove and set aside.
Place egg whites in a large, clean bowl of the electric mixer with the whisk attachment and beat on medium speed, until soft peaks. Increase to med-high speed and slowly add the remaining ¼ cup of sugar, over 15-20 seconds or so. Continue to beat for another ½ minute. Add the yolk mixture to the whites and whisk for 1 minute.
Pour the warm butter in a liquid measure cup (or a spouted container). * It must be a deep bottom bowl and work must be fast.* Put the nut meal in a mesh strainer (or use your hand – working quickly) and sprinkle it in about 2 tablespoons at a time – folding it carefully for about 40 folds. Be sure to exclude any large chunks/pieces of nuts. Again, work quickly and carefully as to not deflate the mixture. When all but about 2 Tbsp. of nut meal remain, quickly and steadily pour the warm butter over the batter. Then, with the remaining nut meal, fold the batter to incorporate, about 13 or so folds.
With a rubber spatula, transfer the batter into the prepared pan, smoothing the surface with the spatula or back of a spoon. **If collected butter remains at the bottom of the bowl, do not add it to the batter! It will impede the cake rising while baking.
Tap the pan on the counter to remove air bubbles and bake in the preheated oven for 30-35 minutes. You’ll know the cake is done when it is springy to the touch and it separates itself from the side of the pan. Remove from oven and allow to stand for 5 minutes. Invert onto a cake rack sprayed with nonstick coating, removing the pan. Cool the cake completely.
*If not using the cake right away, wrap thoroughly in plastic wrap, then in a plastic bag, then in the refrigerator for up to 3 days. If freezing, wrap in foil, then the bag and use within 2-3 months.
For the Sugar Syrup
Makes 1 cup, good for one 10-inch cake – split into 3 layers
Makes 1 cup, good for one 10-inch cake – split into 3 layers
1 cup water
¼ cup sugar
2 Tbsp. dark rum or orange flavored liqueur
In a small, yet heavy saucepan, bring the water and sugar to a boil and simmer for 5 minutes. Remove from heat, add the liqueur. Cool slightly before using on the cake. *Can be made in advance.
For the Praline Buttercream
1 recipe Swiss Buttercream
1/3 cup praline paste
1 ½ - 2 Tbsp. Jamaican rum (optional)
Blend ½ cup buttercream into the paste, then add to the remaining buttercream. Whip briefly on med-low speed to combine. Blend in rum.
For the Swiss Buttercream
4 lg. egg whites
¾ cup sugar
1 ½ cups (3 sticks) unsalted butter, slightly firm
1 ½ -2 Tbsp. Grand Marnier or liqueur of your choice
1 tsp. vanilla
Place the egg whites in a large bowl of a electric mixer and beat with the whisk attachment until the whites are foamy and they begin to thicken (just before the soft peak stage). Set the bowl over a saucepan filled with about 2 inches of simmering water, making sure the bowl is not touching the water. Then, whisk in the sugar by adding 1-2 tablespoon of sugar at a time over a minutes time. Continue beating 2-3 minutes or until the whites are warm (about 120 degrees) and the sugar is dissolved. The mixture should look thick and like whipped marshmallows.
Remove from pan and with either the paddle or whisk attachment, beat the egg whites and sugar on med-high until its a thick, cool meringue – about 5-7 minutes. *Do not overbeat*. Set aside.
Place the butter in a separate clean mixing bowl and, using the paddle attachment, cream the butter at medium speed for 40-60 seconds, or until smooth and creamy. *Do not overbeat or the butter will become toooooo soft.
*On med-low speed, blend the meringue into the butter, about 1-2 Tbsp. at a time, over 1 minute. Add the liqueur and vanilla and mix for 30-45 seconds longer, until thick and creamy.
Refrigerate 10-15 minutes before using.
Wait! My buttercream won’t come together! Reheat the buttercream briefly over simmering water for about 5 seconds, stirring with a wooden spoon. Be careful and do not overbeat. The mixture will look broken with some liquid at the bottom of the bowl. Return the bowl to the mixer and whip on medium speed just until the cream comes back together.
Wait! My buttercream is too soft! Chill the buttercream in the refrigerator for about 10 minutes and rewhip. If that doesn’t work, cream an additional 2-4 Tbsp. of butter in a small bowl– making sure the butter is not as soft as the original amount, so make sure is cool and smooth. On low speed, quickly add the creamed butter to the buttercream, 1 Tbsp. at a time.
Refrigerate in an airtight container for up to 5 days, or can be frozen for up to 6 months. If freezing, store in 2 16-oz. plastic containers and thaw in the refrigerator overnight or at room temperature for several hours.
For the Praline Paste
1 cup (4 ½ oz.) Hazelnuts, toasted/skinless
2/3 cup sugar
Line a jelly roll pan with parchment and lightly butter.
Put the sugar in a heavy 10-inch skillet. Heat on low flame for about 10-20 min until the sugar melts around the edges. Do not stir the sugar. Swirl the pan if necessary to prevent the melted sugar from burning. Brush the sides of the pan with water to remove sugar crystals. If the sugar in the center does not melt, stir briefly. When the sugar is completely melted and caramel in color, remove from heat. Stir in the nuts with a wooden spoon and separate the clusters. Return to low heat and stir to coat the nuts on all sides. Cook until the mixture starts to bubble. **Remember – extremely hot mixture.** Then onto the parchment lined sheet and spread as evenly as possible. As it cools, it will harden into brittle. Break the candied nuts into pieces and place them in the food processor. Pulse into a medium-fine crunch or process until the brittle turns into a powder. To make paste, process for several minutes. Store in an airtight container and store in a cook dry place. Do not refrigerate.
For the Apricot Glaze
Good for one 10-inch cake
2/3 cup thick apricot preserves
1 Tbsp. water
In a small, yet heavy saucepan, bring the water and preserves to a slow boil and simmer for 2-3 minutes. If the mixture begins to stick to the bottom of the saucepan, add water as needed.
Remove from heat and, using a strainer, press the mixture through the mesh and discard any remnants. With a pastry brush, apply the glaze onto the cake while the cake is still warm. If the glaze is too thick, thin to a preferred consistency with drops of water.
For the Ganache Glaze
Makes about 1 cup, enough to cover the top and sides of a 9 or 10 inch layer or tube cake
**Ganache can take on many forms. While warm – great fudge sauce. While cool or lukewarm – semisweet glaze. Slightly chilled – can be whipped into a filling/frosting. Cold & solid – the base of candied chocolate truffles.
6 oz. (good) semisweet or bittersweet chocolate, like Lindt
6 oz. (¾ cup) heavy cream
1 tbsp. light corn syrup
1 Tbsp. Grand Marnier, Cointreau, or dark Jamaican rum (optional)
¾ tsp. vanilla
½ - 1 tsp. hot water, if needed
Blend vanilla and liqueur/rum together and set aside.
Break the chocolate into 1-inch pieces and place in the basket of a food processor and pulse until finely chopped. Transfer into a medium sized bowl and set aside.
Heat the cream and corn syrup in a saucepan, on low, until it reached a gentle boil. Once to the gently boil, immediately and carefully pour over the chocolate. Leave it alone for one minute, then slowly stir and mix the chocolate and cream together until the chocolate is melted and incorporated into the cream. Carefully blend in vanilla mixture. If the surface seems oily, add ½ - 1 tsp hot water. The glaze will thicken, but should still be pourable. If it doesn’t thicken, refrigerate for about 5 minutes, but make sure it doesn’t get too cold!

Assembling the Cake
Cut a cardboard disk slightly smaller than the cake. Divide the cake into 3 layers and place the first layer top-side down on the disk. Using a pastry brush, moisten the layer with 3-4 Tbsp. of warm sugar syrup. Measure out 1 cup of praline buttercream and set aside.
Spread the bottom layer with a ¼-inch thickness of the remaining buttercream. Cover with ½ of the whipped cream, leaving ¼-inch border around the edge of the cake. Place the middle layer over the first, brush with sugar syrup, spreading with buttercream. Cover with the remaining whipped cream.
Moisten the cut side of the third layer with additional sugar syrup and place cut side down on the cake. Gently, press the sides of the cake to align the layers. Refrigerate to chill for at least 30 minutes.
Lift the cake by sliding your palm under the cardboard. Holding a serrated or very sharp night with an 8-inch blade held parallel to the sides of the cake, trim the sides so that they are perfectly straight. Cut a slight bevel at the top to help the glaze drip over the edge. Brush the top and sides of the cake with warm apricot glaze, sealing the cut areas completely. Chill while you prepare the ganache.
Place a rack over a large shallow pan to catch the ganache drippings. Remove the gateau from the refrigerator and put it the rack. With a metal spatula in hand, and holding the saucepan about 10 inches above the cake, pour the ganache onto the cake’s center. Move the spatula over the top of the ganache about 4 times to get a smooth and mirror-like appearance. The ganache should cover the top and run down the sides of the cake. When the ganache has been poured and is coating the cake, lift one side of the rack and bang it once on the counter to help spread the ganache evenly and break any air bubbles. (Work fast before setting starts.) Patch any bare spots on the sides with a smaller spatula, but do not touch the top after the “bang”. Let the cake stand at least 15 minutes to set after glazing.
To garnish the cake, fit a 12 – 14-inch pastry bag with a #114 large leaf tip. Fill the bag with the reserved praline cream. Stating ½ inch from the outer edge of the cake, position the pastry tube at a 90 degree angle with the top almost touching the top of the cake. Apply pressure to the pastry bag, moving it slightly toward the center of the cake. As the buttercream flows on the cake, reverse the movement backward toward the edge of the cake and finish by pulling the bag again to the center. Stop applying pressure and press the bag downward, then quickly pull the tip up to break the flow of frosting. Repeat, making 12 leaves evenly spaced around the surface of the cake.
Make a second row of leaves on the top of the first row, moving the pastry bag about ¾ inch closer to the center. The leaves should overlap. Make a 3rd row, moving closer and closer to the center. Add a 4th row if you have the room. But, leave a 2-inch space in the center for a chopped filbert garnish. Refrigerate uncovered for 3-4 hours to allow the cake to set. Remove the cake from the refrigerator at least 3 hours before serving.
Leftover cake can be covered with foil and kept in the refrigerator for up to 5 days.

What's-in-the-box Wednesday 7/30/08
 I'm back with my weekly update on what's in my CSA box. I skipped a couple weeks because a few weeks ago, my box went missing and last week, I totally spaced on taking pictures before the week got away from me. This week's harvest box is probably my favorite so far this season, as I love everything in it. It's probably not too ambitious to say that I think most of it will be gone by the weekend.
This week we found the following in our box:
- Chard
- Bell peppers

- Tomatoes

- Yukon Gold potatoes

- Cucumbers
- Red onions

- Sweet corn
Now, I know you're not supposed to play with your food, but I was fooling around with all the produce and this just made me laugh. It's my own personal produce man.
July 24, 2008
Salmon for the Rest of Us
 When you have a food allergy, eating out or even going to a friend's for dinner can feel a little intimidating. I'm allergic to fish and seafood, and multiple trips to the emergency room over the years have taught me that if something has gills or fins, swims or just plain lives in the water, I am to stay away from it.
For today's Barefoot Bloggers assignment, our hostess—Ashley of The Spicy Skillet— selected Smoked Salmon Spread. Obviously, a recipe with the words "smoked salmon" in the title is likely to scare the bejeezus out of someone like me. I had a brief oh-crap moment and then started brainstorming as to how I could stay as true as possible to the original recipe (without having to visit my friendly neighborhood ER doc yet again). I simply substituted chicken for the salmon. And, I cut back on the cream cheese and sour cream. One, because I wanted it to have the consistency of traditional chicken salad and not a spread; and two, to reduce the fat and calories.
The modifications worked out great. The dill and chicken complemented one another nicely and the combination made for a cool, crisp summer sandwich.
 Dill Chicken Salad Sandwiches
adapted from Ina Garten's Smoked Salmon Spread
1 lb boneless, skinless chicken breasts
4 ounces cream cheese, at room temperature
1/4 cup sour cream
1 tablespoon freshly squeezed lemon juice
1 tablespoon minced fresh dill
1 teaspoon prepared horseradish, drained
1/2 teaspoon kosher salt
1/4 teaspoon freshly ground black pepper
Preheat the oven to 350 degrees F.
Arrange chicken in a glass baking dish. Bake in the preheated oven for about 25 minutes. Turn the chicken pieces over and bake for another 25 minutes, or until the juices run clear.
Once the chicken cools, cut into small cubes and set aside in a large bowl. Cream the cheese in an electric mixer fitted with a paddle attachment until just smooth. Add the sour cream, lemon juice, dill, horseradish, salt, and pepper, and mix. Add to the cooked, cubed and cooled chicken and mix well. Chill for at least an hour before serving.
To assemble your sandwiches, use any combination of breads and vegetables that appeals to you. I used pumpernickel bread and the following veggies: red onions, sprouts, cucumbers and tomatoes.

I've also made Ina's:
July 10, 2008
The Salsa Conspiracy
 First it was tomatoes.
Then jalapeños.
Now cilantro has been added to the list of possible sources of the salmonella poisoning striking more than 1000 Americans in recent months.
So, what I want to know is:
Who has it out for our dear, spicy friend salsa?
It's a little coincidental that all these ingredients on "the list" somehow all appear in salsa. I mean what's next, onions?
Of course, this is all in jest and is my weak way of trying to bring a little bit of humor to a bummer situation. As a consumer, it is scary to know if what you are eating is safe. But, the group hurt most is the farming community. Many farmers are taking a big hit during this salmonella scare, even if their produce is just fine. Hopefully, the true source will be identified soon and we can all go back to our chips and salsa without worrying about it wreaking havoc on our intestines.
So, what does any of this have to do with my blog anyway? Well, for the latest installment of the Barefoot Bloggers (for which I am a week late posting), Sabrina and Alexander from Cooking with the Kids charged the group with making Ina Garten's delicious Jalapeño Cheddar Cornbread. There was some group discussion as to whether or not it would be safe to use jalapenos as called for in Ina's recipe. Many decided against it and either omitted it or substituted for something else. I'm lucky to live in an area where local produce abounds and you can buy directly from many farmers. I was able to get my hands on some locally grown jalapenos and, therefore, include them in my cornbread. While it's certainly never without risk when you're eating food grown by someone else, I feel good knowing I was able to continue supporting those whose livelihoods depend on the farming industry.
I never knew until doing a little research on the subject, but it turns out cornbread is a pretty contentious issue, with many clamoring to have their recipe earn the distinction of "the best cornbread ever." Really, I like pretty much any kind of cornbread out there just fine and have yet to come across one that knocked my socks off. Ina's recipe included. It was tasty and easy to make. That's about it. I'd make it again, but I don't know that I would personally hang on to this recipe as the end-all, be-all in cornbread recipes.
 Jalapeño Cheddar Cornbread
3 cups all-purpose flour
1 cup yellow cornmeal
1/4 cup sugar
2 tablespoons baking powder
2 teaspoons kosher salt
2 cups milk
3 extra-large eggs, lightly beaten
1/2 pound (2 sticks) unsalted butter, melted, plus extra to grease the pan
8 ounces aged extra-sharp Cheddar, grated, divided
1/3 cup chopped scallions, white and green parts, plus extra for garnish, 3 scallions
3 tablespoons seeded and minced fresh jalapeño peppers
1 cup yellow cornmeal
1/4 cup sugar
2 tablespoons baking powder
2 teaspoons kosher salt
2 cups milk
3 extra-large eggs, lightly beaten
1/2 pound (2 sticks) unsalted butter, melted, plus extra to grease the pan
8 ounces aged extra-sharp Cheddar, grated, divided
1/3 cup chopped scallions, white and green parts, plus extra for garnish, 3 scallions
3 tablespoons seeded and minced fresh jalapeño peppers
Combine the flour, cornmeal, sugar, baking powder, and salt in a large bowl. In a separate bowl, combine the milk, eggs, and butter. With a wooden spoon, stir the wet ingredients into the dry until most of the lumps are dissolved. Don't overmix! Mix in 2 cups of the grated Cheddar, the scallions and jalapeños, and allow the mixture to sit at room temperature for 20 minutes.
Meanwhile, preheat the oven to 350 degrees F. Grease a 9 by 13 by 2-inch baking pan.
Pour the batter into the prepared pan, smooth the top, and sprinkle with the remaining grated Cheddar and extra chopped scallions. Bake for 30 to 35 minutes, or until a toothpick comes out clean. Cool and cut into large squares. Serve warm or at room temperature.

July 9, 2008
What's-in-the-Box Wednesday 7/9/08
What's in the box this week?
Absolutely nothing.
I'm totally disappointed. We went to get our weekly harvest box at our regular location, a local juice bar, and were told by the clearly uninterested teenage employee that somebody else already came to pick up our box. I explained that was impossible since my husband specifically called me earlier in the day to say he wouldn't make it in time and could I please pick it up for him instead. Again, I asked the young man to check the fridge one more time just to make sure it didn't get misplaced accidentally. He did and came up empty handed.
I emailed the farm, letting them know of the situation and asking how they handle boxes of produce that grow legs. They seem really flexible, so I am hoping they will just double up the quantity in our box next week. Haven't heard back yet, but will report back.
So, no farm-fresh produce for us this week.
July 6, 2008
A Fistful of Fruit
 One of the best things about summer is the abundance of fresh produce available. No matter if you get your produce at a grocery store, at your local farmers' market, by belonging to a CSA or even ordering online, many fruits and veggies are currently at their prime and flavor abounds.
I'm always looking for unique ways to serve all this tasty fruit to my family and friends. Outside of a fruit salad or fruit kabob, how do you get a decent serving of fruit in an unexpected way?
I've done cold fruit soup in the past and, while lovely, it always seems cumbersome for guests unless we are having a sit-down meal. And if we're being honest, we only have formal get-togethers a couple times a year and usually during the fall and winter months. Certainly not during the peak of summer when the mercury tops out in 110s around here.
So I took the cold soup idea one step further and came up with the idea of fruit puree "shots". It's quick to make, easy for guests and ensures everyone has plenty of room in their belly to sample all the other items on the menu. By using clear shot glasses, you also get to showcase the gorgeous colors in in their simplest form.
You could really use any variation of fruit for this, so be creative and experiment. I like the idea of high-contrast fruits and tossed around these combos:
- Blueberry puree topped with mango puree
- Strawberry puree topped with pineapple puree
- Watermelon puree topped with cucumber puree
The main thing to consider is that the heavier or denser puree would be better on the bottom to avoid blending of the colors. I think it would be fun to do a variety of flavor combos for large crowds.
Another variation on this concept would be a shot of tomato gazpacho as a side dish to a vegetable sandwich. Summer Fruit Shots
Adapted from Two-Colored Fruit Gazpacho recipe by Andrew Weil, M.D.
3 kiwi fruits, peeled 1 tablespoon freshly squeezed lime juice
2 pints chilled fresh raspberries
1 tablespoon sugar
8 ounces lime-flavored sparkling water
2 fresh mint leaves, cut into thin strips,
1 tablespoon sugar
8 ounces lime-flavored sparkling water
2 fresh mint leaves, cut into thin strips,
12 tall shot glasses
12 whole fresh mint leaves, for garnish
Process the kiwis and the lime juice in the food processor until smooth.
Process the raspberries and sugar in a food processor until they are smooth. Strain the raspberry puree through a colander to trap the seeds and transfer it to a big bowl. Add the sparkling water and mint and stir.
Pour equal amounts of the kiwi-lime puree into each glass. Pour equal amounts of the raspberry puree on top of the kiwi-lime puree. Garnish each glass with a mint leaf.

June 30, 2008
Pain Au Choco-Bana: Belated
Almost any food combination that includes chocolate appeals to me.
Chocolate and peanut butter.
Chocolate and pistachio.
Chocolate and raspberry.
... Even chocolate and bacon (if you don't believe me, you need to order a Mo's Bacon Bar. Out-freaking-standing!)
You name it, if it includes chocolate, I usually like it. But, one of my all-time favorites is chocolate and banana.
For the June Daring Bakers recipe, our hosts—Kelly of Sass & Veracity and Ben of What's Cooking?—challenged us to tackle yeasted laminated dough in the form of a danish braid. Huh? I have to be honest that I get a little freaked out every time I have to work with yeast, let alone dough layered with butter. It scares the bejeezus out of me . Will it rise properly? Will the butter actually form layers or just blend in? I'm convinced this is why Julia Child always took a swig of her sherry while she was in the kitchen. Maybe she was just taking the edge off from attempting challenging dishes? . . . I digress.
The only hard and fast rules for this challenge was that we had to make at least one danish braid using the recipe provided. The suggested filling was apple, but we were given the option to go sweet or savory and use any filling of our choice. Since I'm always looking for excuses to eat chocolate, I knew I wanted to include that in my filling, but certainly didn't want just chocolate. I glanced around my kitchen for inspiration and fixed on the bananas across the room on my counter. Banana pastry cream and chocolate. Lovely combination.
While the total time took a while, the actual labor involved in making the dough was fairly easy and straight forward. I had to make the dough twice because I realized I misread the ingredient measurements the first time and added way too much flour. Otherwise, it came together easily for this home chef. The hard part was keeping track of how many times I turned the dough. I tend to multi-task, so kept track of my progress by making hash marks on my printed recipe. If you have a lot going on while making this, mark the dough with your finger (as the recipe suggests) or keep track on paper of how many times you have turned it. I found it to be a simple, yet helpful tip. The braiding came together quickly and I topped with the egg wash and some coarse sugar. The directions instruct you to fold up the ends of the braid, but I lean towards a more rustic look with pastries and rather enjoy seeing the filling peek out a little. So, I skipped that step and left my ends exposed.

As for the taste, I loved, loved, LOVED it! I made modifications to an existing vanilla pastry cream I had, so I was unsure it would come out okay, but I was so thrilled with the outcome. Just the right amount of banana flavor without being obnoxious. And the pairing with semi-sweet chocolate was the perfect balance. I cut it when it was still a little warm, so the chocolate and banana blended together.
For more yummy braids, check out the Daring Bakers blogroll. I'm a few days late getting my post up, so any Daring Baker regulars are probably overloaded on braids by now. Hopefully, this is at least different than anything you've seen. I haven't had a chance to look yet myself, so can't wait to see how everyone else interpreted the recipe. The opportunities are really endless. Thanks again to Kelly and Ben for a great challenge. Danish Dough
from Sherry Yard's The Secrets of Baking
Makes 2-1/2 pounds dough (enough for two large braids)
For the dough (detrempe)
1 ounce fresh yeast or 1 tablespoon active dry yeast
1/2 cup whole milk
1/3 cup sugar
Zest of 1 orange, finely grated
3/4 teaspoon ground cardamom
1-1/2 teaspoons vanilla extract
1/2 vanilla bean, split and scraped
2 large eggs, chilled
1/4 cup fresh orange juice
3-1/4 cups all-purpose flour
1 teaspoon salt
For the butter block (beurrage)
1/2 pound (2 sticks) cold unsalted butter
1/4 cup all-purpose flour
For the filling
1 cup milk
1/2 cup sugar
1/4 cup all-purpose flour
pinch of salt
2 egg yolks, slightly beaten
1 banana, mashed
1 tablespoon fresh lemon juice
1 4-ounce semi-sweet chocolate baking bar To make the dough:
Combine yeast and milk in the bowl of a mixer fitted with the paddle attachment and mix on low speed. Slowly add sugar, orange zest, cardamom, vanilla extract, vanilla seeds, eggs, and orange juice. Mix well. Change to the dough hook and add the salt with the flour, 1 cup at a time, increasing speed to medium as the flour is incorporated. Knead the dough for about 5 minutes, or until smooth. You may need to add a little more flour if it is sticky. Transfer dough to a lightly floured baking sheet and cover with plastic wrap. Refrigerate for 30 minutes.
Without a standing mixer: Combine yeast and milk in a bowl with a hand mixer on low speed or a whisk. Add sugar, orange zest, cardamom, vanilla extract, vanilla seeds, eggs, and orange juice and mix well. Sift flour and salt on your working surface and make a fountain. Make sure that the “walls” of your fountain are thick and even. Pour the liquid in the middle of the fountain. With your fingertips, mix the liquid and the flour starting from the middle of the fountain, slowly working towards the edges. When the ingredients have been incorporated start kneading the dough with the heel of your hands until it becomes smooth and easy to work with, around 5 to 7 minutes. You might need to add more flour if the dough is sticky.
To make the butter block:
Combine butter and flour in the bowl of a mixer fitted with a paddle attachment and beat on medium speed for 1 minute. Scrape down the sides of the bowl and the paddle and then beat for 1 minute more, or until smooth and lump free. Set aside at room temperature.
After the detrempe has chilled 30 minutes, turn it out onto a lightly floured surface. Roll the dough into a rectangle approximately 18 x 13 inches and ¼ inch thick. The dough may be sticky, so keep dusting it lightly with flour. Spread the butter evenly over the center and right thirds of the dough. Fold the left edge of the detrempe to the right, covering half of the butter. Fold the right third of the rectangle over the center third. The first turn has now been completed. Mark the dough by poking it with your finger to keep track of your turns, or use a sticky and keep a tally. Place the dough on a baking sheet, wrap it in plastic wrap, and refrigerate for 30 minutes.
Place the dough lengthwise on a floured work surface. The open ends should be to your right and left. Roll the dough into another approximately 13 x 18 inch, ¼-inch-thick rectangle. Again, fold the left third of the rectangle over the center third and the right third over the center third. No additional butter will be added as it is already in the dough. The second turn has now been completed. Refrigerate the dough for 30 minutes.
Roll out, turn, and refrigerate the dough two more times, for a total of four single turns. Make sure you are keeping track of your turns. Refrigerate the dough after the final turn for at least 5 hours or overnight. The Danish dough is now ready to be used. If you will not be using the dough within 24 hours, freeze it. To do this, roll the dough out to about 1 inch in thickness, wrap tightly in plastic wrap, and freeze. Defrost the dough slowly in the refrigerator for easiest handling. Danish dough will keep in the freezer for up to 1 month.
 To make the filling
Heat milk in saucepan on medium-high until very hot. In a bowl, combine sugar, flour and salt. Whisk hot milk into bowl with dry ingredients. Pour the mixture back into saucepan. Heat to a boil, stirring constantly. Cook over medium heat a couple minutes, stirring constantly until mixture is thick and smooth. Reduce heat to low. Whisk in yolks and cook for a few minutes more. Remove from heat and let cool, stirring occasionally.
Mash bananas and lemon juice until smooth Add to milk mixture. Cover and refrigerate.
To assemble the danish braid:
1 recipe danish dough (see above)
1 recipe banana pastry cream, plus chocolate
Egg wash (1 large egg, plus 1 large egg yolk)
Line a baking sheet with a silicone mat or parchment paper. On a lightly floured surface, roll the danish dough into a 15 x 20-inch rectangle, ¼ inch thick. If the dough seems elastic and shrinks back when rolled, let it rest for a few minutes, then roll again. Place the dough on the baking sheet.
Along one long side of the pastry make parallel, 5-inch-long cuts with a knife or rolling pastry wheel, each about 1 inch apart. Repeat on the opposite side, making sure to line up the cuts with those you’ve already made. Spoon the filling you’ve chosen to fill your braid down the center of the rectangle. Starting with the top and bottom “flaps”, fold the top flap down over the filling to cover. Next, fold the bottom “flap” up to cover filling. This helps keep the braid neat and helps to hold in the filling. Now begin folding the cut side strips of dough over the filling, alternating first left, then right, left, right, until finished. Trim any excess dough and tuck in the ends.
 Egg Wash
Whisk together the whole egg and yolk in a bowl and with a pastry brush, lightly coat the braid.
Proofing and Baking
Spray cooking oil onto a piece of plastic wrap, and place over the braid. Proof at room temperature or, if possible, in a controlled 90 degree F environment for about 2 hours, or until doubled in volume and light to the touch.
Near the end of proofing, preheat oven to 400 degrees F. Position a rack in the center of the oven.
Bake for 10 minutes, then rotate the pan so that the side of the braid previously in the back of the oven is now in the front. Lower the oven temperature to 350 degrees F, and bake about 15-20 minutes more, or until golden brown. Cool and serve the braid either still warm from the oven or at room temperature. The cooled braid can be wrapped airtight and stored in the refrigerator for up to 2 days, or freeze for 1 month.

June 12, 2008
Be Elegant, Be Earthy
 Ina Garten is known for her simple, but sophisticated approach to food. Many also know her as the Barefoot Contessa, a moniker she earned from the Hampton's specialty store by the same name, which she used to own.
One of the reasons I admire Ina's cooking is that she always starts with good ingredients. I recently came across a group of other zealous Ina fans, where every two weeks members make the same recipe and post their results on the same day. The group, called Barefoot Bloggers, is currently about 70-members strong.
The first recipe for June is Pasta, Pesto and Peas. This was a super easy recipe and I could definitely see making this as a side dish for a summer barbecue. I made two substitutions: swapped the frozen spinach for frozen since I got a supply in my weekly CSA harvest box, and I used all fusilli pasta instead of a combo. As a superfan of all things basil, I thought the overall flavor was tasty. However, I could easily have done with about half the mayonnaise, as I am not so much a fan. It was just way too creamy for me, but cutting down the mayo is an easy enough modification.

Pasta, Pesto and Peas
3/4 pound fusilli pasta
3/4 pound bow tie pasta
1/4 cup good olive oil
1 1/2 cups pesto, packaged or see recipe below
1 (10-ounce) package frozen chopped spinach, defrosted and squeezed dry
3 tablespoons freshly squeezed lemon juice
1 1/4 cups good mayonnaise
1/2 cup freshly grated Parmesan
1 1/2 cups frozen peas, defrosted
1/3 cup pignolis (pine nuts)
3/4 teaspoon kosher salt
3/4 teaspoon freshly ground black pepper
3/4 pound bow tie pasta
1/4 cup good olive oil
1 1/2 cups pesto, packaged or see recipe below
1 (10-ounce) package frozen chopped spinach, defrosted and squeezed dry
3 tablespoons freshly squeezed lemon juice
1 1/4 cups good mayonnaise
1/2 cup freshly grated Parmesan
1 1/2 cups frozen peas, defrosted
1/3 cup pignolis (pine nuts)
3/4 teaspoon kosher salt
3/4 teaspoon freshly ground black pepper
Cook the fusilli and bow ties separately in a large pot of boiling salted water for 10 to 12 minutes until each pasta is al dente. Drain and toss into a bowl with the olive oil. Cool to room temperature.
In the bowl of a food processor fitted with a steel blade, puree the pesto, spinach, and lemon juice. Add the mayonnaise and puree. Add the pesto mixture to the cooled pasta and then add the Parmesan, peas, pignolis, salt, and pepper. Mix well, season to taste, and serve at room temperature.
Pesto:
1/4 cup walnuts
1/4 cup pignolis (pine nuts)
3 tablespoons chopped garlic (9 cloves)
5 cups fresh basil leaves, packed
1 teaspoon kosher salt
1 teaspoon freshly ground black pepper
1 1/2 cups good olive oil
1 cup freshly grated Parmesan
Place the walnuts, pignolis, and garlic in the bowl of a food processor fitted with a steel blade. Process for 15 seconds. Add the basil leaves, salt, and pepper. With the processor running, slowly pour the olive oil into the bowl through the feed tube and process until the pesto is thoroughly pureed. Add the Parmesan and puree for a minute. Use right away or store the pesto in the refrigerator or freezer with a thin film of olive oil on top.
Notes: Air is the enemy of pesto. For freezing, pack it in containers with a film of oil or plastic wrap directly on top with the air pressed out.
To clean basil, remove the leaves, swirl them in a bowl of water, and then spin them very dry in a salad spinner. Store them in a closed plastic bag with a slightly damp paper towel. As long as the leaves are dry they will stay green for several days.
Yield: 4 cups

June 11, 2008
What's-in-the-Box Wednesday 6/11/08
 This week's CSA harvest box was teeming with goodies:
- Arugula
- Beets
- Carrots
- Lettuce
- Onions
- Parsley
- Radishes
We were delighted to discover we also got an extra bunch of greens (not sure which variety) and a bag of cherries. We had cherries in the house from our neighborhood grocery store, so did an impromptu taste test of the two kinds. There was no comparing. The ones from our farm were sweeter and tasted more like a cherry should. The store-bought ones tasted fine, but were a little tart and didn't have that lingering sweet cherry taste.
 We just got the box yesterday, but the beets are arugula are already gone. Our farm includes a newsletter each week that talks about farm happenings, describes the week's harvest and provides a recipe to help you create meals with your harvest. The recipe this week was for a beet and arugula salad tossed with a simple dressing of olive oil, balsamic, garlic, salt and pepper. We topped it with feta crumbles and it made a perfect light dinner.


June 4, 2008
What's-in-the-Box Wednesday 6/4/08
 Determined to get more vegetables in our diet, we purchased a CSA share for the 2008 harvest season. Short for community supported agriculture, a CSA is simply a group of community members who commit to support a local farm in exchange for a supply of fresh produce throughout the growing season.
CSA programs vary from farm to farm. Mine offers a few different box options: veggie (two sizes), fruit (two sizes), salad and tomatoes. Some also offer flowers, eggs and meat. Since this is our first year, we are keeping it simple and just went with the small veggie box. We are considering adding a fruit share, but are waiting to see how it works for us for a few more weeks before committing to more.
Our particular CSA runs May through October and we received our third box this week. The produce is just gorgeous and tastes so good. I've decided to show off my bounty each week in a regular post I'm calling What's-in-the-Box Wednesday. Sorry, I didn't take pictures of the first two weeks' boxes. This week, we received:
- Basil
- Carrots
- Cherry tomatoes
- Chinese cabbage
- Garlic
- Radishes
- Red chidori kale
If a weekly box of locally grown veggies sound good to you, you may be able to find a CSA in your area. If you already belong to a CSA, I'd love to see what you receive each week or hear how it's going for you.


Subscribe to:
Posts (Atom)

 Posts


